In this post, I will be going through cryptography basic concepts, how to setup gpg, and how to convert keys between different formats.
- Terminology
- Setup GPG
- Symmetric Key Encryption
- Asymmetric Key Encryption
- Hybrid Encryption
- Conversions
- Conclusion
Terminology
- Privacy-Enhanced Mail (PEM) is a de facto file format for storing and sending cryptographic keys, certificates, and other data, based on a set of 1993 IETF
- PGP - Pretty Good Privacy
- OpenPGP - OpenPGP was initially derived from the PGP software, created by Phil Zimmermann
- GnuPG - GNU Privacy Guard. GnuPG is a complete and free implementation of the OpenPGP standard as defined by RFC4880 (also known as PGP)1
Setup GPG
- Follow steps mentioned in gnupg.org to install gpg.
- Use these settings to harden configuration gpg.conf,
copy this file to
~/.gnupg/gpg.conf - Use these settings to configure gpg agent gpg-agent.conf,
depending on operating system change the
pinentry-program, for MacOS use/usr/local/bin/pinentry-macand for linux use/usr/bin/pinentry-curses - Make sure you have in your shell rc file.
  GPG_TTY=`tty`
  export GPG_TTY
gpg --full-gen-keyto generate keys. Mostly you will choose RSA with 4096 bits. If you want to generate ECC (Elliptic Curve Cryptography) keys, then you need to use expert optiongpg --expert --full-gen-keygpg --list-secret-keysto list secret/private keysgpg --list-keysto list public keysgpg --armor --export YOUR_KEY_IDto export public key in ASCII formatgpg --armor --export-secret-keys > secret_key.gpgto export secret/private key. Note this should NOT be shared and should be kept in a safe location.- If you are vim user, then refer this section to configure vim for gpg
- By default, one encryption subkey is created for the private key; you can create as many subkeys as you want, one subkey for signing, one key for authentication, etc. Refer this guide
- You can use the authentication subkey for SSH, follow below steps
gpg --expert --edit-key <KEY ID>to edit your key- Type
addkeyin gpg prompt - Select
RSA (set your own capabilities)option 8 - Select
sto Toggle the sign capability - Select
eto Toggle the encrypt capability - Select
ato Toggle the authenticate capability - In
Current allowed actions, make sure onlyAuthenticateis selected - Select
qto Finished - Specify the key size and expiry
saveandquit- Make sure you have
enable-ssh-supportin~/.gnupg/gpg-agent.conf - Execute
gpg -K --with-keygripand then look for subkey that has[A]and copy Keygrip and paste in~/.gnupg/sshcontrol - Tell SSH how to access the gpg-agent,
export SSH_AUTH_SOCK=$(gpgconf --list-dirs agent-ssh-socket) - And launch gpg agent
gpgconf --launch gpg-agent - Run
ssh-add -Lto list public keys which can be shared and put inauthorized_keysof the server which you want to login.
- If you want to use an already existing ssh RSA key to add to your GPG, then follow the below steps
- Make sure ssh RSA has PEM format -
ssh-keygen -p -m PEM -f id_rsa - Make temp home directory -
mkdir temp_gpg - Give right permissions -
chmod go-rwx -R temp_gpg/ - Export private key
gpg -a --export-secret-keys <KEY_ID> > my_gpg_key.asc - With temp_gpg as home directory import above key -
gpg --homedir temp_gpg --import my_gpg_key.asc - Verify above import -
gpg2 -K --homedir temp_gpg/ - Install Monkeysphere to convert from SSH PEM format to OpenPGP format.
wget https://download-ib01.fedoraproject.org/pub/epel/7/x86_64/Packages/m/monkeysphere-0.37-1.el7.noarch.rpm rpm -Uvh monkeysphere-0.37-1.el7.noarch.rpm # Make sure you have perl installed, prior to this step yum install monkeysphere - Convert and import SSH RSA key
pem2openpgp temporary_id < .ssh/id_rsa | gpg --import --homedir temp_gpg/ - Now when you do
gpg -K --with-keygrip --homedir temp_gpg/you should see secret keysecwithuidastemporary_id, copy that id - Add SSH key as the subkey
- Edit your primary key -
gpg --homedir temp_gpg --expert --edit-key <KEY ID> - Then type
addkeyand selectExisting key(option 13) - For the prompt
Enter the keygrip- paste the keygrip you copied in the above step. - Select
sto Toggle the sign capability - Select
eto Toggle the encrypt capability - Select
ato Toggle the authenticate capability - In
Current allowed actions, make sure onlyAuthenticateis selected - Select
qto Finished - Specify the key size and expiry
saveandquit
- Edit your primary key -
- export the new key
gpg --homedir temp_gpg -a --export-secret-keys <KEY ID> > my_new_gpg_key.asc - import the new key
gpg --import my_new_gpg_key.asc - Verify import
gpg -K --with-keygrip - Make sure you have
enable-ssh-supportin~/.gnupg/gpg-agent.conf - Execute
gpg -K --with-keygripand then look for subkey that has[A]and copy Keygrip and paste in~/.gnupg/sshcontrol - Tell SSH how to access the gpg-agent,
export SSH_AUTH_SOCK=$(gpgconf --list-dirs agent-ssh-socket) - And launch gpg agent
gpgconf --launch gpg-agent - Run
ssh-add -Lto list public keys which can be shared and put inauthorized_keysof the server which you want to login.
- Make sure ssh RSA has PEM format -
- You can use Mailvelope browser plugin to encrypt and decrypt emails in Gmail/Yahoo mail.
- If you are on Andriod, you can use OpenKeyChain to manage your keys.
Symmetric Key Encryption
One key, same key is used to encrypt and decrypt.
Example Algorithms - AES-128, AES-192 and AES-256
Using GPG
echo "hello world" | gpg -ca --cipher-algo AES256
Or to encrypt a file
gpg --symmetric --armor --cipher-algo AES256 file.txt
Usually you should be getting a pop-up asking for password/secret.
Note: By default encryption will happen in binary format.
-a or --armor will output the encrypted text in ASCII format.
To decrypt
gpg -d cyphertext.txt
Using openssl
echo "hello world" | openssl enc -aes-128-cbc -salt -a -e
Or to encrypt a file
openssl enc -aes-128-cbc -salt -a -e -in /tmp/test1.txt -out /tmp/test1.txt.enc
To decrypt
openssl enc -aes-128-cbc -salt -a -d -in /tmp/test1.txt.enc -out /tmp/test1.txt
You can also generate a long password like below
openssl rand -base64 128 > /tmp/pw.txt
And use that to encrypt
openssl enc -aes-128-cbc -salt -a -e -pass file:/tmp/pw.txt -in /tmp/test1.txt -out /tmp/test1.txt.enc
And to decrypt
openssl enc -aes-128-cbc -salt -a -d -pass file:/tmp/pw.txt -in /tmp/test1.txt.enc
Note: cbc stands for Cipher Block Chaining
Asymmetric Key Encryption
Two keys, one key to encrypt and one key to decrypt.
One key is kept secret, and another is shared to the public. The public key is used to encrypt, and the private key is used to decrypt.
Example Algorithms - EIGamal, RSA, DSA, Elliptic curve techniques, and PKCS.
Using GPG
echo "hello world" | gpg -ea --recipient recipient@mail.com
Or to encrypt a whole file
gpg --output doc.gpg -ea --recipient recipient@mail.com doc
To Decrypt
gpg --output doc --decrypt doc.gpg
Using OpenSSL
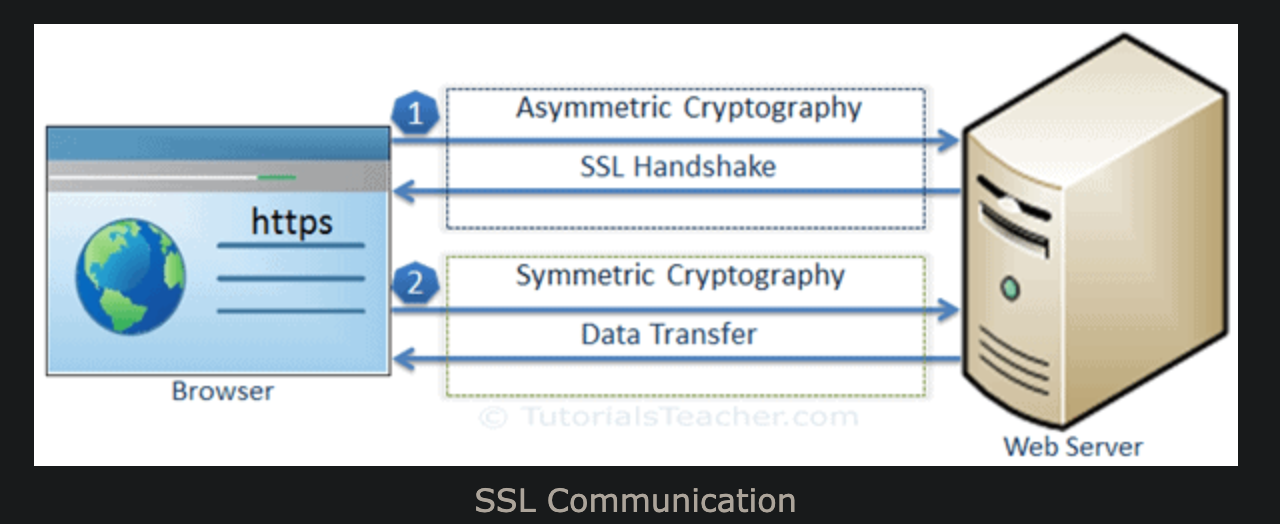
OpenSSL is used to generate keys for SSL communication. SSL uses Asymmetric Key Encryption for SSL Handshake and uses Symmetric Key Encryption for exchanging data between server and client.
To generate a private key of length 2048 bits
openssl genrsa -aes256 -out /tmp/priv.key 2048
To generate public key for above key
openssl rsa -in /tmp/priv.key -pubout -out /tmp/pub.key
To get the public key in ssh format
chmod 600 /tmp/priv.key
ssh-keygen -y -f /tmp/priv.key
Encrypt using public key
openssl rsautl -encrypt -pubin -inkey /tmp/pub.key -in /tmp/test1.txt -out /tmp/test1.txt.enc
Decrypt using private key
openssl rsautl -decrypt -inkey /tmp/priv.key -in /tmp/test1.txt.enc -out /tmp/test1.txt
Using above the encrypted file will be in binary. You can also below method, to get in ASCII format
#Encrypt
openssl rsautl -encrypt -pubin -inkey /tmp/pub.key -in /tmp/test1.txt |
   openssl base64 > /tmp/test1.txt.enc.asc

#Decrypt
openssl base64 -d < /tmp/test1.txt.enc.asc |
   openssl rsautl -decrypt -inkey /tmp/priv.key
Note: Asymmetric Key Encryption is mostly used to exchange short encrypted messages (for example symmetric key secrets), they are not intended to encrypt large files. For example Asymmetric key of length 2048 bits can encrypt only 245 bytes - refer this. Use symmetric key encryption for large files.
Hybrid Encryption
In general, Hybrid Encryption is used where both Asymmetric and symmetric key is used. That’s how usually SSL and SSH works.
For example, if you have someone ssh public key, you can follow the below steps. To send the encrypted message
- Generate a 256 bit (32 byte) random key -
openssl rand -out /tmp/secret.key 32 - Using the above key encrypt the data using symmetric key algorithm AES
openssl enc -aes-128-cbc -salt -a -e -pass file:/tmp/secret.key -in /tmp/test1.txt -out /tmp/test1.txt.enc - Using asymmetric key algorithm RSA, encrypt above secret key using the public key of the recipient
openssl rsautl -encrypt -oaep -pubin -inkey <(ssh-keygen -e -f /tmp/ssh_pub.key -m PKCS8) -in /tmp/secret.key | openssl base64 > /tmp/secret.key.enc.asc - Delete the symmetric key -
rm -rf /tmp/secret.key - Now both, encrypted symmetric secret
/tmp/secret.key.enc.ascand encrypted text/tmp/test1.txt.enccan be shared to the recipient.
The recipient can use below steps to decrypt the message
- Decrypt the
secret.key.enc.ascto getsecret.keyusing private key (using RSA Asymmetric algorithm)openssl rsautl -decrypt -oaep -inkey /tmp/priv.key -in <(openssl base64 -d < /tmp/secret.key.enc.asc) -out /tmp/secret.keyNow, decrypt the data using the symmetric key (secret.key).
openssl enc -aes-128-cbc -salt -a -d -pass file:/tmp/secret.key -in /tmp/test1.txt.enc
Conversions
You can convert keys from one format to another by below steps.
OpenSSH to OpenSSL
- To convert from OpenSSH private key to OpenSSL private key
- Make sure the OpenSSH private key is in PEM format. If the first line (head -1 id_rsa) of
id_rsais-----BEGIN OPENSSH PRIVATE KEY-----, then it is not in PEM format. - You can convert to PEM format using
ssh-keygen -p -m PKCS8 -f id_rsa - After conversion, you should see the first line of
id_rsachanged to-----BEGIN ENCRYPTED PRIVATE KEY----- - To convert to OpenSSL key -
openssl rsa -in ~/.ssh/id_rsa -out key_rsa.pem
- Make sure the OpenSSH private key is in PEM format. If the first line (head -1 id_rsa) of
- To create a certification request -
openssl req -new -key ~/.ssh/id_rsa -out myid.csr - To create OpenSSL self-signed certificate (public key)
openssl x509 -req -days 3650 -in myid.csr -signkey ~/.ssh/id_rsa -out myid.crtOpenSSL to OpenSSH
- Private keys format is the same between OpenSSL and OpenSSH. So you just have to rename your OpenSSL key -
cp myid.key id_rsa - In OpenSSL, there is no specific file for public keys (public keys are generally embedded in certificates). However, you
extract the public key from the private key file -
ssh-keygen -y -f myid.key > id_rsa.pubGnuPG to OpenSSH
- First, you need to know the fingerprint of your RSA key. You can use -
gpg --list-secret-keys --keyid-format short - Next, you can use openpgp2ssh tool distributed in with monkeyshpere project -
gpg --export-secret-keys 01234567 | openpgp2ssh 01234567 > id_rsa - You can now extract ssh public key using -
ssh-keygen -y -f id_rsa > id_rsa.pub
Conclusion
I hope this post helped you understand cryptography basics.
– RC
-
The GNU Privacy Guard. https://preview.gnupg.org/ ↩


Comments