In this post, I will go through how to customize neovim. If you are new to Vim, I suggest you go through this post to get familiarize with Vim first.
Installation
| Operating System | Install command |
|---|---|
| MacOS | brew install neovim |
| Debian based OS | apt install neovim |
| Redhat based OS | yum install neovim |
| Windows OS | choco install neovim |
Default Commands
Neovim is forked out of Vim; all key bindings of Vim should work. Refer Vim default key bindings
Configuration
Neovim supports configuration using Lua. (You can still use init.vim).
Here I will be discussing how to configure using Lua.
The configuration file is located at $HOME/.config/nvim. Create init.lua in $HOME/.config/nvim
Set options using Vimscript
You can directly write vim script like below
local cmd = vim.cmd

-- General settings
cmd [[syntax on]]
cmd [[filetype plugin indent on]]
cmd [[let g:onedark_style = 'darker']]
cmd [[colorscheme gruvbox]]
Set options using Lua
Below is how you can set options in Lua.
local opt = vim.opt
local o = vim.o

opt.backup = false -- don't use backup files
opt.writebackup = false -- don't backup the file while editing
opt.swapfile = false -- don't create swap files for new buffers
opt.updatecount = 0 -- don't write swap files after some number of updates

opt.history = 1000 -- store the last 1000 commands entered
opt.textwidth = 120 -- after configured number of characters, wrap line

opt.backspace = {"indent", "eol,start"} -- make backspace behave in a sane manner
opt.clipboard = {"unnamed", "unnamedplus"} -- use the system clipboard
opt.mouse = "a" -- set mouse mode to all modes

-- searching
opt.ignorecase = true -- case insensitive searching
opt.smartcase = true -- case-sensitive if expresson contains a capital letter
opt.hlsearch = true -- highlight search results
opt.incsearch = true -- set incremental search, like modern browsers
opt.lazyredraw = false -- don't redraw while executing macros
opt.magic = true -- set magic on, for regular expressions

-- error bells
opt.errorbells = false
opt.visualbell = true
opt.timeoutlen = 500

-- Appearance
---------------------------------------------------------
o.termguicolors = true
opt.number = true -- show line numbers
opt.wrap = false -- turn on line wrapping
opt.wrapmargin = 8 -- wrap lines when coming within n characters from side
opt.linebreak = true -- set soft wrapping
opt.showbreak = "↪"
opt.autoindent = true -- automatically set indent of new line
opt.ttyfast = true -- faster redrawing

opt.laststatus = 2 -- show the status line all the time
opt.scrolloff = 7 -- set 7 lines to the cursors - when moving vertical
opt.wildmenu = true -- enhanced command line completion
opt.hidden = true -- current buffer can be put into background
opt.showcmd = true -- show incomplete commands
opt.showmode = true -- don't show which mode disabled for PowerLine
opt.wildmode = {"list", "longest"} -- complete files like a shell
opt.shell = env.SHELL
opt.cmdheight = 1 -- command bar height
opt.title = true -- set terminal title
opt.showmatch = true -- show matching braces
opt.mat = 2 -- how many tenths of a second to blink
opt.updatetime = 300
opt.signcolumn = "yes"
opt.shortmess = "atToOFc" -- prompt message options

-- Tab control
opt.smarttab = true -- tab respects 'tabstop', 'shiftwidth', and 'softtabstop'
opt.tabstop = 4 -- the visible width of tabs
opt.softtabstop = 4 -- edit as if the tabs are 4 characters wide
opt.shiftwidth = 4 -- number of spaces to use for indent and unindent
opt.shiftround = true -- round indent to a multiple of 'shiftwidth'

-- code folding settings
cmd [[set foldmethod=expr]] -- use treesitter folding support
cmd [[set foldexpr=nvim_treesitter#foldexpr()]]
opt.foldlevelstart = 99
opt.foldnestmax = 10 -- deepest fold is 10 levels
opt.foldenable = false -- don't fold by default
opt.foldlevel = 1

-- toggle invisible characters
opt.list = false
opt.listchars = {
  tab = "→ ",
  eol = "↲",
  trail = "⋅",
  extends = "❯",
  precedes = "❮"
}

opt.autoread = true
opt.cursorline = true
opt.autowrite = true
Set global options using Lua
Below is how you can set global settings
local g = vim.g
g.mapleader = ","
Custom bindings in lua
You can set key bindings like below
local map = vim.api.nvim_set_keymap
map('n', '<Leader>w', ':write<CR>', {noremap = true})
You can use helper functions like below.
Create ~/.config/nvim/lua/globals.lua and add below content
_GlobalCallbacks = _GlobalCallbacks or {}

_G.globals = {_store = _GlobalCallbacks}

function globals._create(f)
  table.insert(globals._store, f)
  return #globals._store
end

function globals._execute(id, args)
  globals._store[id](args)
end
Create ~/.config/nvim/lua/utils.lua and add below content
local api = vim.api
local fn = vim.fn
local utils = {}

-- thanks to
-- https://github.com/akinsho/dotfiles/blob/main/.config/nvim/lua/as/globals.lua
-- for inspiration
local function make_keymap_fn(mode, o)
  -- copy the opts table as extends will mutate opts
  local parent_opts = vim.deepcopy(o)
  return function(combo, mapping, opts)
    assert(combo ~= mode, string.format("The combo should not be the same as the mode for %s", combo))
    local _opts = opts and vim.deepcopy(opts) or {}

    if type(mapping) == "function" then
      local fn_id = globals._create(mapping)
      mapping = string.format("<cmd>lua globals._execute(%s)<cr>", fn_id)
    end

    if _opts.bufnr then
      local bufnr = _opts.bufnr
      _opts.bufnr = nil
      _opts = vim.tbl_extend("keep", _opts, parent_opts)
      api.nvim_buf_set_keymap(bufnr, mode, combo, mapping, _opts)
    else
      api.nvim_set_keymap(mode, combo, mapping, vim.tbl_extend("keep", _opts, parent_opts))
    end
  end
end

local map_opts = {noremap = false, silent = true}
utils.nmap = make_keymap_fn("n", map_opts)
utils.xmap = make_keymap_fn("x", map_opts)
utils.imap = make_keymap_fn("i", map_opts)
utils.vmap = make_keymap_fn("v", map_opts)
utils.omap = make_keymap_fn("o", map_opts)
utils.tmap = make_keymap_fn("t", map_opts)
utils.smap = make_keymap_fn("s", map_opts)
utils.cmap = make_keymap_fn("c", map_opts)

local noremap_opts = {noremap = true, silent = true}
utils.nnoremap = make_keymap_fn("n", noremap_opts)
utils.xnoremap = make_keymap_fn("x", noremap_opts)
utils.vnoremap = make_keymap_fn("v", noremap_opts)
utils.inoremap = make_keymap_fn("i", noremap_opts)
utils.onoremap = make_keymap_fn("o", noremap_opts)
utils.tnoremap = make_keymap_fn("t", noremap_opts)
utils.cnoremap = make_keymap_fn("c", noremap_opts)

function utils.has_map(map, mode)
  mode = mode or "n"
  return fn.maparg(map, mode) ~= ""
end

function utils.has_module(name)
  if
    pcall(
      function()
        require(name)
      end
    )
   then
    return true
  else
    return false
  end
end

function utils.termcodes(str)
  return api.nvim_replace_termcodes(str, true, true, true)
end

return utils
Now in your ~/.config/nvim/init.lua you can do like below to do custom bindings.
require("globals")
local utils = require("utils")

local nmap = utils.nmap
local vmap = utils.vmap
local imap = utils.imap
local xmap = utils.xmap
local omap = utils.omap
local nnoremap = utils.nnoremap
local inoremap = utils.inoremap
local vnoremap = utils.vnoremap


-- CUSTOM key bindings
nmap("<leader>c", ":windo diffthis<cr>")
nmap("<leader>C", ":windo diffoff<cr>")
nmap("<leader>d", ":bd!<cr>")
nmap("<leader>e", ":enew<cr>")
nmap("<leader>h", ":nohl<cr>")
nmap("<leader>l", ":set list!<cr>")
nmap("<leader>q", ":q<cr>")
nmap("cr",":let @*=expand('%')<cr>")
-- Split settings
nmap("-", ":new<cr>")
nmap("|", ":vnew<cr>")
-- quick fix
nmap("<space>q", ":copen<cr>")
nmap("<space>Q", ":cclose<cr>")
-- Search selected text in visual mode
vnoremap("//", 'y/<C-R>"<cr>')
Plugin Manager
You can either use Vim Plug or Packer. I will show you on how to use packer plugin manager. Install packer plugin manager.
git clone --depth 1 https://github.com/wbthomason/packer.nvim\
 ~/.local/share/nvim/site/pack/packer/start/packer.nvim
Create ~/.config/nvim/lua/plugins folder and create init.lua file.
Have below content
local fn = vim.fn
local install_path = fn.stdpath('data')..'/site/pack/packer/start/packer.nvim'

if fn.empty(fn.glob(install_path)) > 0 then
  packer_bootstrap = fn.system({'git', 'clone', '--depth', '1', 'https://github.com/wbthomason/packer.nvim', install_path})
end

return require('packer').startup(function(use)
  -- My plugins here
  -- use 'foo1/bar1.nvim'
  use 'wbthomason/packer.nvim'

  -- Automatically set up your configuration after cloning packer.nvim
  -- Put this at the end after all plugins
  if packer_bootstrap then
    require('packer').sync()
  end
end)
At line number 12, you will be adding the plugins you want to install.
For example, you want to install a gruvbox theme, then you will add use 'morhetz/gruvbox'
Then you can do :PackerCompile, :PackerInstall to install the plugin.
Interesting Plugins
Most plugins available in Vim should work with Neovim, but there are some plugins in Neovim, which is done in Lua, does not support Vim. I discussed most vim plugins in Steps to customize Vim. Below are some interesting plugins.
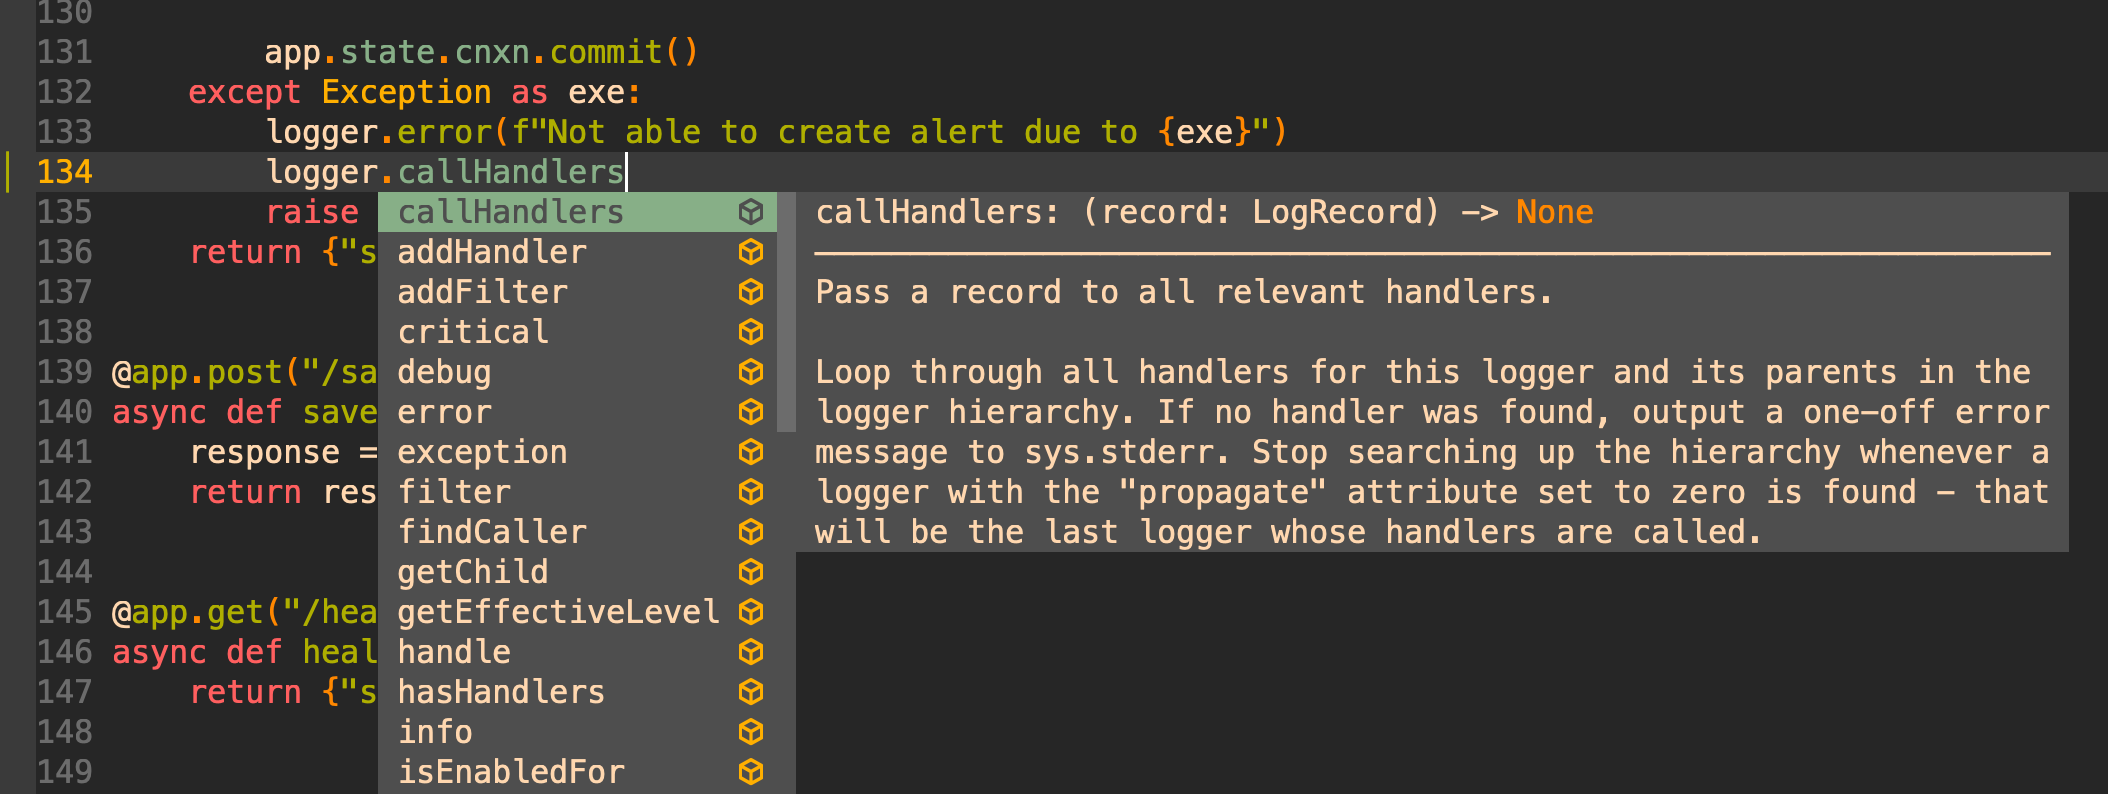
Language Server Protocol
Neovim out of the box supports LSP (Language Server Protocol) refer nvim-lspconfig
Below are some plugins that help in code completion & LSP.
  -- code completion - LSP
  use 'neovim/nvim-lspconfig'
  use 'williamboman/nvim-lsp-installer'
  use 'onsails/lspkind-nvim'
  use 'hrsh7th/cmp-nvim-lsp'
  use 'hrsh7th/cmp-buffer'
  use 'hrsh7th/cmp-path'
  use 'hrsh7th/cmp-cmdline'
  use 'hrsh7th/nvim-cmp'
  use 'glepnir/lspsaga.nvim'
- williamboman/nvim-lsp-installer - Companion plugin for nvim-lspconfig that allows you to seamlessly install LSP servers locally.
- onsails/lspkind-nvim - This tiny plugin adds vscode-like pictograms to neovim built-in lsp
- hrsh7th/nvim-cmp - Gives all the auto completion needed in neovim.
- glepnir/lspsaga - Gives options on fixing issues found in code (similar to vscode)
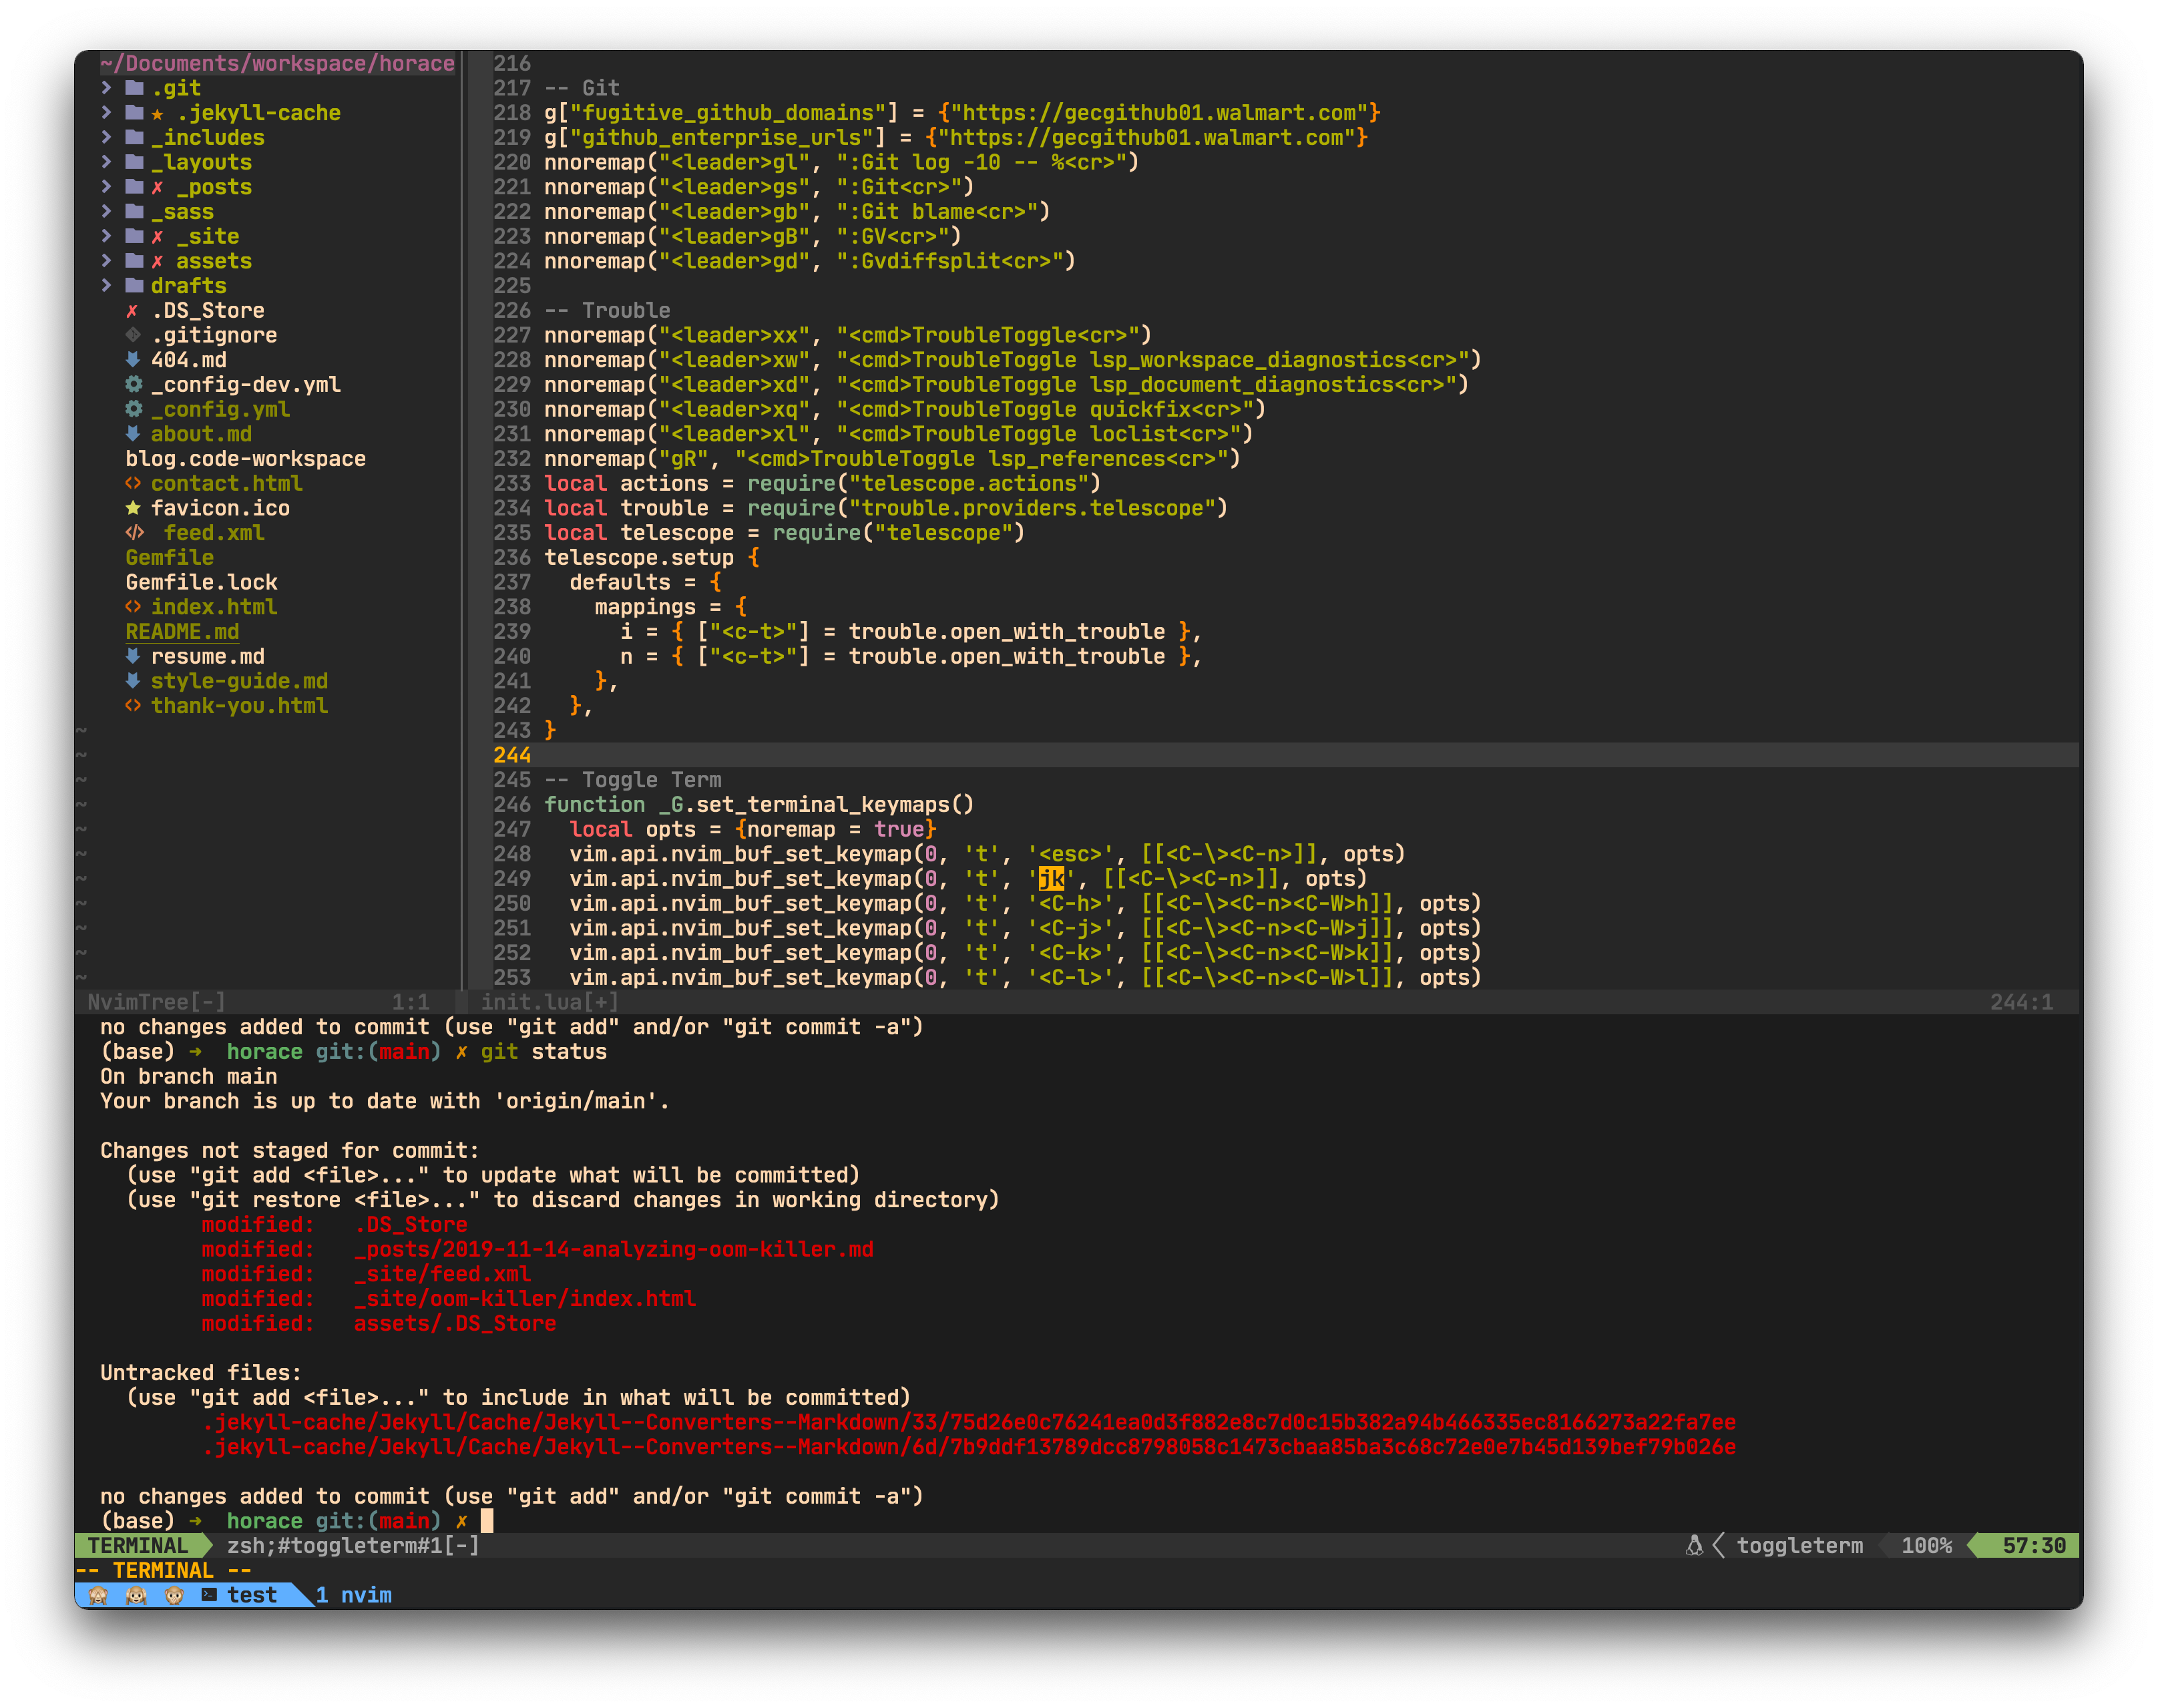
Navigating files
- nvim-tree - Gives tree view of folders in left sidebar.
- telescope - Gives fuzzy search with previews (similar to fzf plugins)
Status Line
In vim, there is vim-airline but requires more configuration in vimrc. lualine is a blazing fast and easy to configure Neovim statusline written in Lua.
  use {
    'nvim-lualine/lualine.nvim',
    requires = {'kyazdani42/nvim-web-devicons', opt = true}
  }
Startup Dashboard
startify gives a welcome dashboard with the most recently used files. You can also customize to add bookmarks.
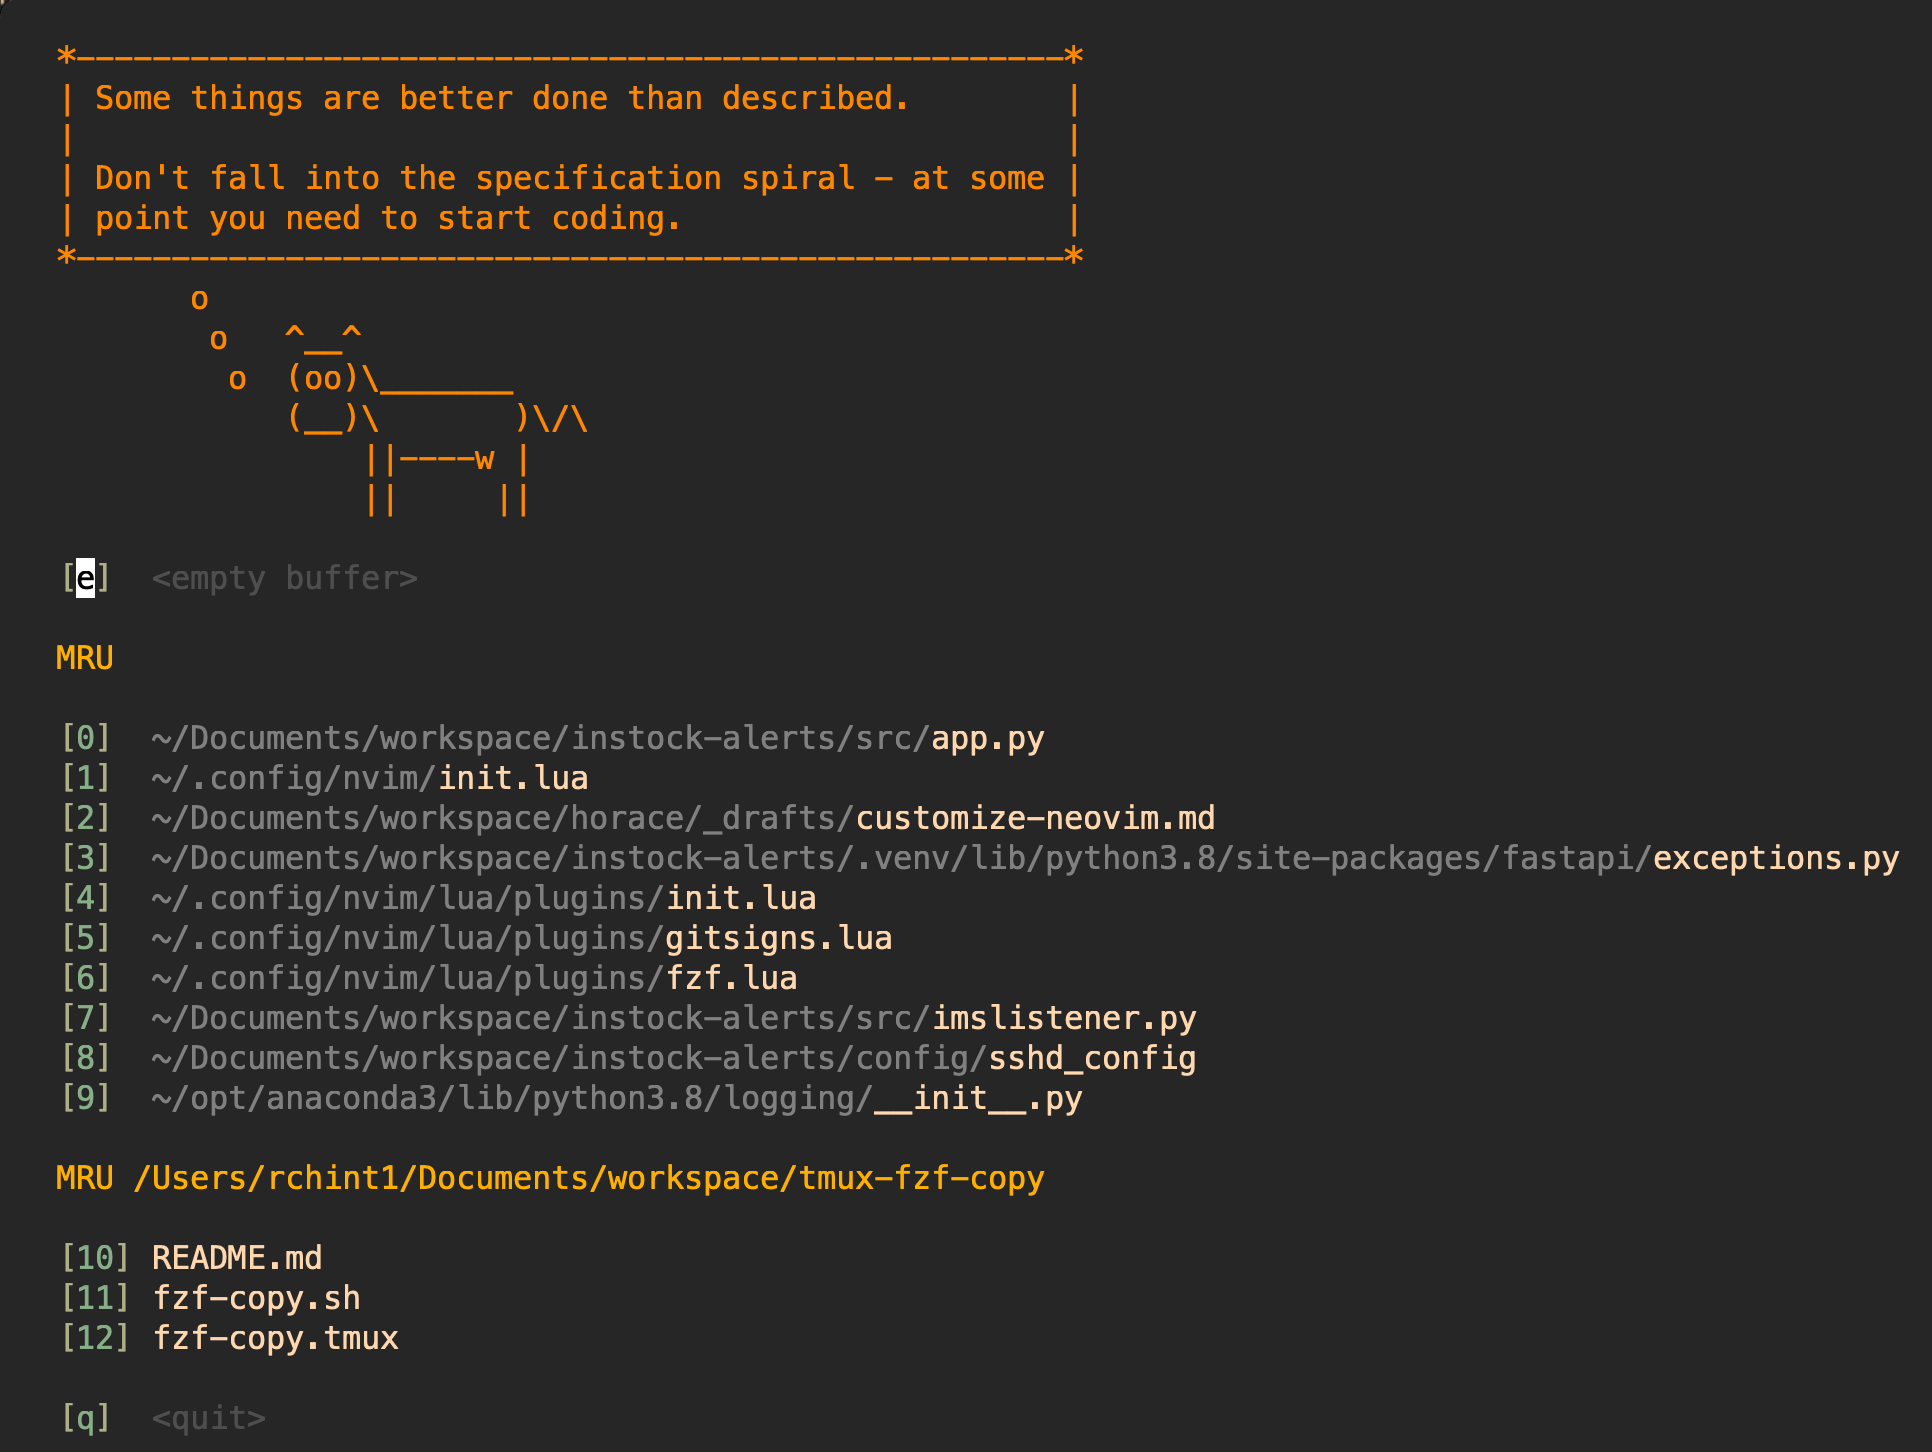
Note: This plugin supports Vim too.
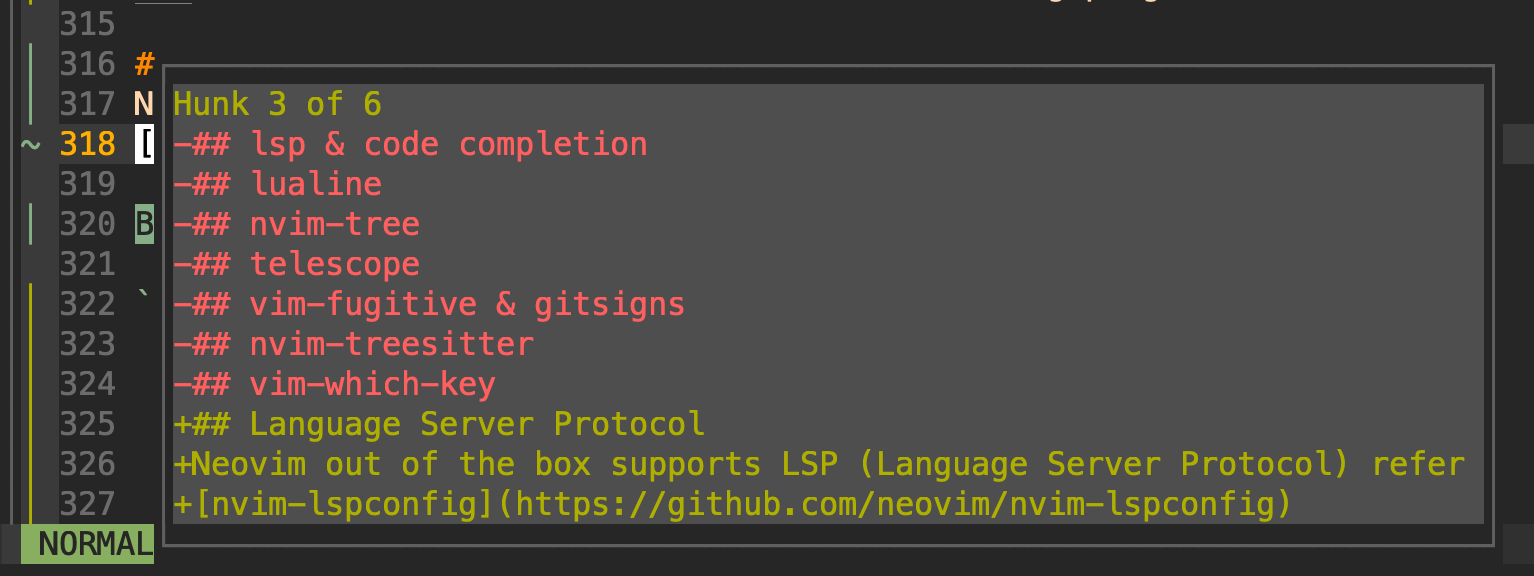
Git
gitsigns gives options to move around git hunks ]c & [c to move
between hunks, this plugin also provides hunk preview like below.
Syntax Highlights
nvim-treesitter provides a simple interface for tree-sitter in Neovim and provides highlighting based on it.
This plugin can be configured like below.
require("nvim-treesitter.configs").setup {
  ensure_installed = "maintained",
  highlight = {
    enable = true,
    use_languagetree = true
  },
  indent = {enable = true},
  rainbow = {
    enable = false,
    extended_mode = true,
    max_file_lines = 1000
  },
  textobjects = {
    select = {
      enable = true,
      lookahead = true, -- automatically jump forward to matching textobj
      keymaps = {
        ["af"] = "@function.outer",
        ["if"] = "@function.inner",
        ["ac"] = "@class.outer",
        ["ic"] = "@class.inner"
      }
    },
    swap = {
      enable = true,
      swap_next = {
        ["<leader>a"] = "@parameter.inner"
      },
      swap_previous = {
        ["<leader>A"] = "@parameter.inner"
      }
    }
  },
  playground = {
    enable = true,
    disable = {},
    updatetime = 25,
    persist_queries = false,
    keybindings = {
      toggle_query_editor = "o",
      toggle_hl_groups = "i",
      toggle_injected_languages = "t",
      toggle_anonymous_nodes = "a",
      toggle_language_display = "I",
      focus_language = "f",
      unfocus_language = "F",
      update = "R",
      goto_node = "<cr>",
      show_help = "?"
    }
  }
}
Which key
vim-which-key is similar to emacs which-key, when you press a key, it will show next available keys; this is useful as there are many key bindings.
You can use below config, to trigger which key to expand on next available keys.
nnoremap("<leader>",":WhichKey ','<cr>")
nnoremap("<space>",":WhichKey '<Space>'<cr>")
nnoremap("f",":WhichKey 'f'<cr>")
Note: This plugin supports Vim too.
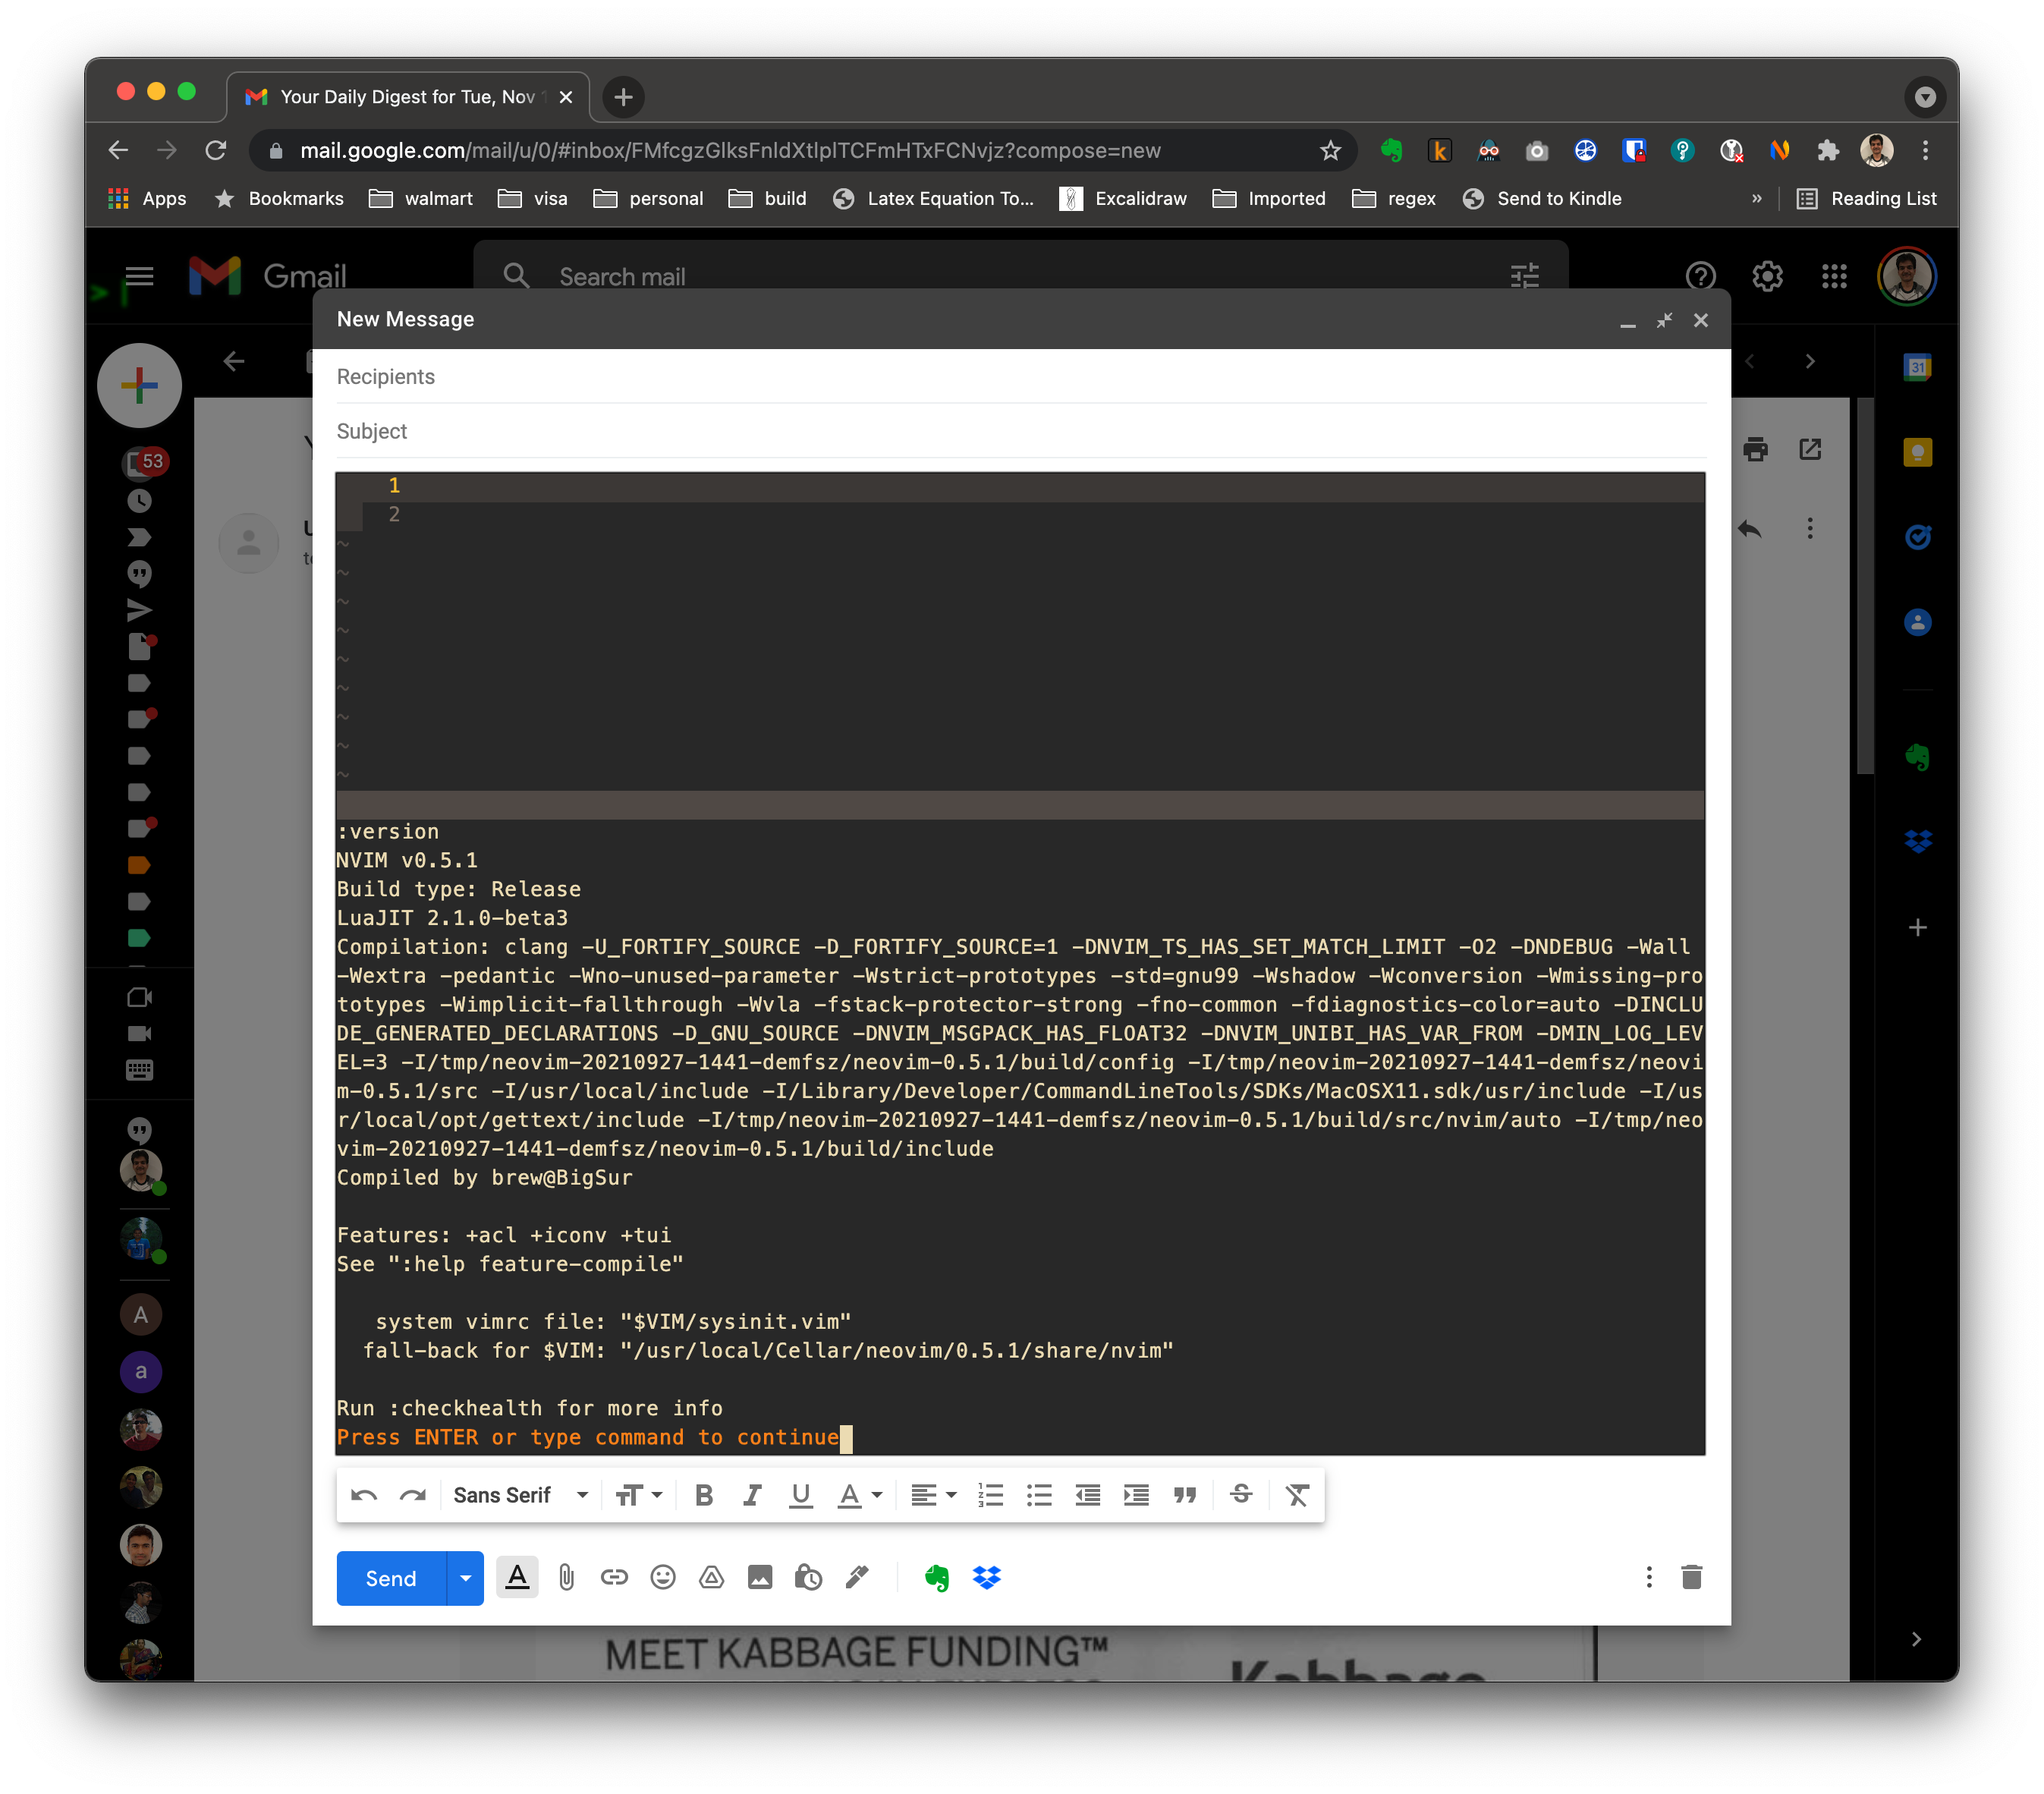
Firenvim
You can use neovim inside Chrome and firefox using Firenvim. You can configure like below in your in init.lua file.
-- Firenvim (browser integration)
vim.cmd 'let g:firenvim_config = { "globalSettings": { "alt": "all", }, "localSettings": { ".*": { "cmdline": "neovim", "content": "text", "priority": 0, "selector": "textarea", "takeover": "always", }, } }'
-- Disable `firenvim` for the particular webiste
vim.cmd 'let fc = g:firenvim_config["localSettings"]'
vim.cmd 'let fc["https?://twitter.com/"] = { "takeover": "never", "priority": 1 }'
-- Change `firenvim` file type to enable syntax highlight, `coc` works perfectly
-- " after this settings!!!
vim.cmd 'autocmd BufEnter github.com_*.txt set filetype=markdown'
vim.cmd 'autocmd BufEnter txti.es_*.txt set filetype=typescript'
-- Increase the font size to solve the `text too small` issue
function IsFirenvimActive(event)
    if vim.g.enable_vim_debug then print("IsFirenvimActive, event: ", vim.inspect(event)) end

    if vim.fn.exists('*nvim_get_chan_info') == 0 then return 0 end

    local ui = vim.api.nvim_get_chan_info(event.chan)
    if vim.g.enable_vim_debug then print("IsFirenvimActive, ui: ", vim.inspect(ui)) end
    local is_firenvim_active_in_browser = (ui['client'] ~= nil and ui['client']['name'] ~= nil)
    if vim.g.enable_vim_debug then print("is_firenvim_active_in_browser: ", is_firenvim_active_in_browser) end
    return is_firenvim_active_in_browser
end
function OnUIEnter(event)
    if IsFirenvimActive(event) then
        -- Disable the status bar
        vim.cmd 'set laststatus=0'

        -- Increase the font size
        vim.cmd 'set guifont=MesloLGSDZ\\ Nerd\\ Font:h20'
    end
end
vim.cmd([[autocmd UIEnter * :call luaeval('OnUIEnter(vim.fn.deepcopy(vim.v.event))')]])
Note: If firenvim is not loading in text area, you can use Cmd+e in MacOS, in Windows/Linux you can use Ctrl+e
Conclusion
Above are some ways to customize neovim. If you want a complete configuration file of the above examples, refer here. Happy Vimming. – RC


Comments